3

Wednesday 9 September 2015

How to Restore a Mac from a Time Machine Backup

How to Restore a Mac from a Time Machine Backup

How to restore an entire Mac from Time Machine backup

While Macs have a great reputation for being stable and rarely experiencing major issues, the reality is that sometimes things can go wrong. Typically this happens when either a hard drive fails or an OS X system update goes completely awry, but if you have set up Time Machine backups on the Mac like all users should, then you will discover that restoring an entire systems hard drive from that Time Machine backup is really quite easy.


To be perfectly clear, restoring Mac OS X and all of your personal stuff from a previously made Time Machine backup is really only needed in extreme situations, and fortunately this is not something that is frequently required or necessary. Nonetheless, it’s good to understand how this process works, so if you ever find yourself in a situation where you have a new hard drive (or even a new Mac), or you just need to perform a complete restore of a previous backup, this tutorial will cover that restoration process of everything with Time Machine.
Note this aims to recover and restore an entire Macincluding all files, all applications, and OS X system software, everything that is made from and contained within a Time Machine backup. If you only want or need to re-install OS X, you can use Internet Recovery for that, which will replace only the system software portion, without any personal files or applications.

Restoring and Recovering an Entire Mac System from Time Machine Backups

  1. Connect the Time Machine backup drive to the Mac if you have not done so already
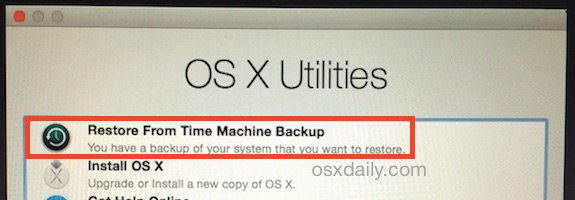
  2. Start up or reboot the Mac and hold down the Command+R keys simultaneously, this will boot into the OS X Recovery Partition
  3. At the “OS X Utilities” screen, choose “Restore from Time Machine Backup” and click on the Continue button
  4. Restore a Mac from Time Machine on boot from Recovery HD
  5. Select the Time Machine volume (either the external back up drive, network Time Capsule, or otherwise)
  6. Select the date and time of the Time Machine backup you wish to restore the entire Mac from, and click on “Continue” – this begins the restoration process from the backup you selected, generally you’ll want to pick the most recently made backup but advanced users may choose another date (keep in mind if you pick an earlier date you will lose files and data created from that date onward)
  7. When Time Machine has finished restoring everything, the Mac will reboot into the restored state from the chosen backup date
Pretty easy, right? You’ll be back on your feet in no time with this method of restoring a hard drive from Time Machine backups.
Of course it may go without saying that this requires a recent Time Machine backup to even restore the Mac from in the first place, which is why setting up Time Machine, letting it perform it’s backup routine on schedule, and ideally starting and completing manual backups before installing system updates or modifying major OS X components is so strongly recommended.
Do note that you can re-install OS X without a Time Machine backup, but you can lose personal files that way. Having frequent backups is basically essential, so if you haven’t done so yet, do yourself a favor and get Time Machine configured with your Mac, hopefully you’ll never need to use the backup service, but if you do, you’ll be happy you set it up.

How to Show All Possible Screen Resolutions for a Display in Mac OS X

How to Show All Possible Screen Resolutions for a Display in Mac OS X

MacBook Pro Retina and 20" External Display, a great Mac setup of a software engineer

Though it’s generally recommended to use the ‘Default for display’ screen resolution option, Mac users who connect their computer to an external display or TV may find it helpful to be able to see, access, and use all possible display resolutions for a particular screen. This can be particularly useful if a display is either showing at an incorrect screen resolution, or if you’d like to use a specific resolution that is not shown in the available ‘Scaled’ resolutions list of OS X.


Reveal All Possible Screen Resolutions for a Display Connected to a Mac

This works to reveal additional screen resolution choices for any display connected to a modern Mac, it also applies to all modern versions of OS X:
  1. Open System Preferences from the  Apple menu in OS X
  2. Click on “Display”
  3. Under the ‘Display’ tab, hold down the OPTION / ALT key while you press on the ‘Scaled’ button alongside Resolution to reveal all available screen resolution options for the display
  4. Choose the resolution desired from the complete list of available screen resolutions, then close out of System Preferences as usual
All possible screen resolutions shown for a Mac Display
You must hold the Option key when clicking on ‘Scaled’ to reveal all possible screen resolutions for the external display(s), and if you have multiple external displays in use on a Mac, you’ll want to hold the option key when choosing “Scaled” and selecting a resolution for each connected display.
Show all possible screen resolutions for a Mac display in OS X
For example, here’s the default selection of “Scaled” resolutions shown on a particularly 24″ external display connected to a MacBook Pro:
Mac display resolutions shown, before revealing all possible screen resolutions
Now after holding down the OPTION key while clicking on the “Scaled” radio button, many additional screen resolutions are revealed as available to use:
All resolutions shown for a Mac Display
Though these additional choices become available, they may not necessarily look right, and they may not render correctly, so just because they’re shown as options does not necessarily indicate you should use them for that particular screen.
Note this does not apply to Retina displays, where changing the resolution is a bit different and is only offered in scaled views rather than numerical resolutions anyway.
As mentioned above, sometimes this trick can be necessary to be able to select the proper screen resolution for an external display, which, although it’s pretty rare, can present itself as an improperly set screen resolution, usually at a lower resolution than what the display can handle. If you encounter that problem, sometimes simply using the Detect Displays feature after disconnecting and reconnecting the screen to the Mac can be sufficient to have the external display find and use the proper screen resolution.

How to Check iCloud Activation Lock Status of an iPhone, iPad, or iPod touch

How to Check iCloud Activation Lock Status of an iPhone, iPad, or iPod touch

How to Check iCloud Activation Lock status of an iPhone, iPad, iPod touch
iCloud Activation Lock is a great feature which allows owners to lock down an iPhone, iPad, or iPod touch and prevent it from being used in the event that a device has been misplaced, stolen, or lost. This is part of the Find My iPhone feature set, and it’s a very welcome addition for iDevice owners. Of course the other side of iCloud Activation Lock is that it can potentially interfere with the resale market of iOS devices, because a device that has been locked will require the attached Apple ID be entered to remove the lock to make it usable again.
To avoid a situation where you purchase a used iPhone, iPad, or iPod touch with Activation Lock enabled, you should take the time to check the devices IMEI or serial number to see what the iCloud Lock status is. This is quite simple to do, and you don’t even need an Apple ID or login to check devices for the activation lock.

Checking iCloud Activation Lock Status of an iPhone, iPad, or iPod touch

This will quickly tell you if a device is iCloud locked or not:
  1. Get the serial number or IMEI from the iPhone, iPad, or iPod touch – either works
  2. Head over to the official Apple website here to check the device iCloud status
  3. Enter the IMEI or serial number, enter the appropriate CAPTCHA code, then click “Continue” to see the result, it will be one of the following:
  4. Enter device info to check iCloud activation lock
    • Activation Lock: ON – this means the current users Apple ID will need to be logged into before another user can activate and use the device
    • Activation Lock: OFF – this means any user will be free to use the device by entering a new Apple ID and setting up the device
    iCloud activation lock status on an iPhone
If you’re buying a used iPhone, you should always check the activation lock status before completing the sale so that you don’t end up with a locked and useless device.
Keep in mind that if the device is activation locked, you’ll want to have the prior owner enter their Apple ID credentials to activate the iPhone, iPad, or iPod touch, and then manually remove the device from their Apple ID account by logging out of iCloud, turning off Find My iPhone, and then resetting it back to factory settings. You can also have the prior owner remotely disable Activation Lock through iCloud, which can be done from anywhere, also requiring the Apple ID log in.
If for whatever reason yourself or the prior owner can’t unlock the device because the forgot the password or email address used, you can follow the instructions to recover a forgotten Apple ID login

.

How to Unblock a Caller on iPhone

How to Unblock a Caller on iPhone


How to Unblock a Contact or Caller on iPhone, iPad, iPod touch

The ability to block people from calling or messaging an iPhone or iPad is an undoubtedly useful feature, but there may come a time where you wish to undo that block. Fortunately, unblocking a contact from iOS is straight forward and easy, so whether you have changed your mind, accidentally blocked someone, or have just decided you want to hear from whoever you blocked again, here’s how you can quickly unblock someone from reaching your iPhone, iPad, or iPod touch through phone calls, FaceTime, and messages.


We’re going to focus on the iPhone here since most users who are blocking numbers and people are likely doing so from an iPhone, though if you happen to be blocking from another iOS device you’ll find the process is the same.

How to UnBlock a Contact to Allow Calling, Messages, and FaceTime from Them Again in iOS

  1. Open the “Settings” app on the iPhone then go to “Phone” *
  2. Scroll down and tap on “Blocked” to see the current list of contacts blocked from reaching you
  3. How to unblock a caller on iPhone, part 1
  4. Tap on the “Edit” button in the corner, then tap on the red (-) minus button alongside a contact name
  5. Confirm you wish to allow that person to reach you again by tapping on the big red “Unblock” button alongside the contact name
  6. Repeat for other contacts you wish to unblock as desired, then tap on “Done” to finish
  7. How to unblock a caller on iPhone, part 2
  8. Exit out of Settings as usual, the contact or person can now reach your iPhone again through FaceTime, phone calls, and messages
Note on an iPad, iPod touch, or iPhone, you can find the same block list in the Messages settings and FaceTime settings, and unblocking a contact from those is identical
In the example screen shots, you’ll see ‘Santa mobile’ being unblocked (who really wants to block Santa anyway? It’s Santa, come on!), which would allow The Claus to be able to reach you again.
You can also just temporarily unblock a number or contact using this trick if you need to communicate with that person or thing, and then immediately block the number again if you want your peace and quiet returned. That’s a particularly helpful strategy for handling nuisance solicitations and sales calls, or if you’re trying to ask to be removed from a call list.


iPad Pro with 12.9″ Display Debuts, Release Date Set for November

iPad Pro with 12.9″ Display Debuts, Release Date Set for November


iPad Pro
Apple has released the all new iPad Pro, which prominently features a large ultra-high resolution 12.9″ display and desktop class computing performance. Additionally, Apple has debuted a new Smart Keyboard for the iPad Pro, and a separate stylus device called Apple Pencil. The combination of the flagship iPad Pro product and these accessories are clearly aimed at a professional user, which should broaden the potential uses of the iPad considerably.
iPad Pro with smart keyboard
The iPad Pro technical specs are as follows:
  • 12.9″ 2732 x 2048 resolution display
  • A9X CPU
  • 10 hour battery life
  • 1.5lbs weight
  • 4 speaker sound system
  • 8MP iSight Camera
  • Touch ID
  • Available in space gray, silver, and gold
iPad Pro tech specs
iPad Pro starts at $799 for 32GB, $949 for 128GB, and goes up to $1079 for 128GB model with cellular capabilities.
the new iPad line
Separately, an optional Smart Keyboard is available for the iPad Pro, which is a physical keyboard integrated into a smart cover, a bit like the Microsoft Surface. The Smart Keyboard is available as an accessory for $169.
iPad Pro smart keyboard
There’s also the Apple Pencil, a stylus for the iPad Pro with pressure sensitivity, that charges directly by plugging into the lightning port of the iPad Pro. The Apple Pencil costs $99
iPad Apple Pencil
iPad Pro and related hardware will be available in November.

DevCenter

DevCenter

Get Xcode Tutorials, iPhone Development Tips, Objective-C Coding, iOS News and more right from your Mac OS X Desktop.
↓ Download
http://dev.center.onemac.net

iPad Pro: Apple just launched its biggest tablet ever


iPad Pro: Apple just launched its biggest tablet ever


iPad Pro: Apple just launched its biggest tablet ever
"iPad is the clearest expression of our vision of personal computing," Apple CEO Tim Cook said in introducing the iPad Pro at the company's event on Wednesday morning. Cook highlighted how the iPad transformed the way people work, learn and use it in the enterprise.
Describing the launch of the largest iPad in Apple's portfolio to date, Cook calls this "the biggest news in iPad since the iPad."

Going pro with iPad Pro

The iPad Pro has the largest screen built in an iOS device. Apple's Phil Schiller confirms that the large format tablet will run the same iOS operating system that is found on Apple's iPhone, iPad Air, iPad Mini and iPod Touch range.
iPad Pro
The large 12.9-inch screen is multi-touch capable with a full-sized keyboard and 5.6 million pixels. The resolution is 2732 x 2048 pixels. This is more pixels than a 15-inch MacBook Pro with Retina Display, Schiller said, highlighting the immersive games, photos, documents and multitasking capabilities.
"This is the most advanced display that we've ever built," said Schiller. There is a custom timing control to drive all the pixels. The display is constructed of an oxide TFT material to drive brightness with a variable refresh rate to conserve battery life.

The brains

Apple claims it has doubled bandwidth and performance with the new A9X chip, which is 1.8 times faster than the A8X that it replaces. Graphics performance has doubled year-over-year.
Apple claims this is faster than 80% of the portable PCs that shipped within the last 8-9 months. This is desktop-class performance, Schiller said, and could be used for graphics-intensive applications, like editing videos.
Apple says that you'll get 10 hours of battery life.

Entertainment

There is now a four-speaker audio system that can balance the audio depending on how you're holding the iPad. The speakers delivers three times the audio volume of the iPad Air 2.
The iPad Pro is just 6.9mm thin, compared to the 6.1mm iPad Air 2. The iPad Pro weighs 1.54 pounds, similar to the original iPad, but it has a much bigger screen.

Keyboard

The keyboard will dynamically change depending on the apps.
Apple is also introducing a new Smart Keyboard accessory for the iPad Pro to give users access to a hardware keyboard, similar to Microsoft's Type Cover for the Surface Pro 3.
iPad Pro keyboard
The keyboard is constructed with a special woven material. There are POGO plugs on the side of the iPad Pro, which carries power and data and connects magnetically to the keyboard.
The software automatically adapts when the keyboard is attached to turn off the software keyboard, freeing up more screen real estate.

iPad Pencil

In addition to a keyboard, Apple is introducing a digital stylus that works alongside the multitouch screen.
You can have a fine or broad stroke as the screen detects the Pencil's angle when placed against the display. The battery is said to last for "hours of use," and the Pencil has a hidden Lightning tip that allows you to recharge the Pencil by plugging it into the iPad Pro's port.
Pencil
"This Apple Pencil is absolutely amazing," Schiller said, highlighting the low latency. Schiller said you can use the Pencil in native apps. You can use it in Notes or in Mail where you can mark up attachments and screenshots before sending them out.
Pencil
The Pencil can be used for drawing, CAD illustrations, writing, and more. Even Microsoft is on stage at this Apple event showing off productivity features of the Apple Pencil and the iPad Pro.
...developing story.